- 搭建git服务器
- 安装gitlab
- 使用gitlab
- gitlab备份和恢复
搭建Git服务器
-
因为github的免费服务的仓库是公开的,而私有仓库又需要购买,所以当开发人数较少,并且项目代码量很少的时候,可以直接使用git来搭建服务器;
-
首先在服务器上安装
git软件包; -
接着添加一个git用户,shell设置为
/usr/bin/git-shell:useradd -s /usr/bin/git-shell git -
然后进入git用户的家目录,在家目录中创建
.ssh目录,并在.ssh目录下创建authorized_keys文件,并将权限设置为600,.ssh目录属主属组设置为git:mkdir .ssh touch .ssh/authorized_keys chmod 600 .ssh/authorized_keys chown -R git:git .ssh -
编辑
authorized_keys文件,将其他机器的公钥添加到文件中,这一步类似于github上为账户添加公钥; -
完成后,我们在另一台机器上使用git用户尝试ssh登录git服务器,看到下面的提示,说明我们的配置没有问题:
[root@localhost .ssh]# ssh git@192.168.49.128 Last login: Wed Sep 12 21:44:43 2018 from 192.168.49.129 fatal: Interactive git shell is not enabled. hint: ~/git-shell-commands should exist and have read and execute access. Connection to 192.168.49.128 closed. -
接着在git服务器上创建仓库目录并使用
git init --bare sample.git将其初始化为裸仓库,裸仓库没有工作区,因为服务器上的Git只是用来共享的,所以不会让用户直接登录到服务器上去改工作区,并且服务器上的Git仓库通常以.git结尾:[root@vm1 git]# mkdir -p /data/gitroot [root@vm1 git]# cd /data/gitroot/ [root@vm1 gitroot]# git init --bare sample.git 初始化空的 Git 版本库于 /data/gitroot/sample.git/ -
将仓库属主属组更改为git用户:
chown -R git.git sample.git/ -
在客户端上,使用
git clone git@[ip]:/data/gitroot/sample.git命令克隆Git服务器上的仓库:[root@localhost ~]# git clone git@192.168.49.128:/data/gitroot/sample.git 正克隆到 'sample'... warning: 您似乎克隆了一个空版本库。 [root@localhost ~]# ls -la sample/ 总用量 0 drwxr-xr-x. 3 root root 18 9月 12 21:56 . dr-xr-x---. 8 root root 280 9月 12 21:56 .. drwxr-xr-x. 7 root root 119 9月 12 21:56 .git -
这时候我们就可以在这个sample仓库内创建文件,然后push到Git服务器上的远程仓库:
[root@localhost sample]# echo 'asdas' > 1.txt [root@localhost sample]# git add 1.txt [root@localhost sample]# git commit -m 'add 1.txt' [root@localhost sample]# git push --set-upstream origin master Counting objects: 3, done. Writing objects: 100% (3/3), 200 bytes | 0 bytes/s, done. Total 3 (delta 0), reused 0 (delta 0) To git@192.168.49.128:/data/gitroot/sample.git * [new branch] master -> master 分支 master 设置为跟踪来自 origin 的远程分支 master。 [root@localhost sample]# -
完成push后,我们再有新的提交,都可以直接使用
git push直接推送到远程仓库,也可以在推送后,在其他目录下再clone一次仓库,看看仓库内的文件:[root@localhost sample]# cp /etc/passwd . [root@localhost sample]# git add passwd [root@localhost sample]# git commit -m 'add passwd' [master 5a477e8] add passwd 1 file changed, 26 insertions(+) create mode 100644 passwd [root@localhost sample]# git push Counting objects: 4, done. Compressing objects: 100% (3/3), done. Writing objects: 100% (3/3), 788 bytes | 0 bytes/s, done. Total 3 (delta 0), reused 0 (delta 0) To git@192.168.49.128:/data/gitroot/sample.git 4496eb6..5a477e8 master -> master [root@localhost sample]# cd /tmp/ [root@localhost tmp]# git clone git@192.168.49.128:/data/gitroot/sample.git 正克隆到 'sample'... remote: Counting objects: 6, done. remote: Compressing objects: 100% (4/4), done. remote: Total 6 (delta 0), reused 0 (delta 0) 接收对象中: 100% (6/6), done. [root@localhost tmp]# ls sample/ 1.txt passwd [root@localhost sample]# git pull remote: Counting objects: 5, done. remote: Compressing objects: 100% (2/2), done. remote: Total 3 (delta 0), reused 0 (delta 0) Unpacking objects: 100% (3/3), done. 来自 192.168.49.128:/data/gitroot/sample 5a477e8..3bdadd0 master -> origin/master 更新 5a477e8..3bdadd0 Fast-forward passwd | 27 +-------------------------- 1 file changed, 1 insertion(+), 26 deletions(-)
GitLab
安装GitLab
-
GitLab是一个用于代码仓库管理系统的开源项目,使用GIt作为代码管理工具,并在此基础上搭建了web服务,所以我们除了一些商用的代码托管网站外,可以使用GItLab自行搭建提供web服务的代码管理平台;
-
GitLab提供开源的社区版以及收费的企业版托管平台,但开源版本同样能够使用与企业版相同的功能,可以在GitLab官网按照官方提供的安装步骤进行GitLab的安装;
-
但是由于官方提供的yum源安装速度很慢,所以我们可以使用国内的镜像yum源进行安装,安装前首先保证服务器内存大于2G,官网建议大于4G;
-
创建
/etc/yum.repos.d/gitlab-ce.repo文件,写入以下内容,国内源来自清华大学开源镜像站:[gitlab-ce] name=Gitlab CE Repository baseurl=https://mirrors.tuna.tsinghua.edu.cn/gitlab-ce/yum/el$releasever/ gpgcheck=0 enabled=1 -
然后执行
yum install -y gitlab-ce进行安装; -
安装完成后,执行
gitlab-ctl reconfigure进行自动的初始化配置,gitlab-ctl是GitLab服务的核心命令; -
安装完成后可以使用
ps aux|grep gitlab和netstat -tlnp查看GitLab的服务和监听端口; -
gitlab-ctl [start|stop|restart|status]可以对GitLab的服务进行管理:[root@vm1 gitroot]# gitlab-ctl stop ok: down: alertmanager: 1s, normally up ok: down: gitaly: 0s, normally up ok: down: gitlab-monitor: 1s, normally up ok: down: gitlab-workhorse: 0s, normally up ok: down: logrotate: 1s, normally up ok: down: nginx: 0s, normally up ok: down: node-exporter: 1s, normally up ok: down: postgres-exporter: 0s, normally up ok: down: postgresql: 0s, normally up ok: down: prometheus: 0s, normally up ok: down: redis: 0s, normally up ok: down: redis-exporter: 1s, normally up ok: down: sidekiq: 0s, normally up ok: down: unicorn: 0s, normally up [root@vm1 gitroot]# gitlab-ctl start ok: run: alertmanager: (pid 7599) 0s ok: run: gitaly: (pid 7607) 1s ok: run: gitlab-monitor: (pid 7618) 0s ok: run: gitlab-workhorse: (pid 7621) 1s ok: run: logrotate: (pid 7636) 0s ok: run: nginx: (pid 7642) 1s ok: run: node-exporter: (pid 7648) 0s ok: run: postgres-exporter: (pid 7654) 1s ok: run: postgresql: (pid 7659) 0s ok: run: prometheus: (pid 7661) 0s ok: run: redis: (pid 7673) 1s ok: run: redis-exporter: (pid 7680) 0s ok: run: sidekiq: (pid 7685) 1s ok: run: unicorn: (pid 7691) 0s -
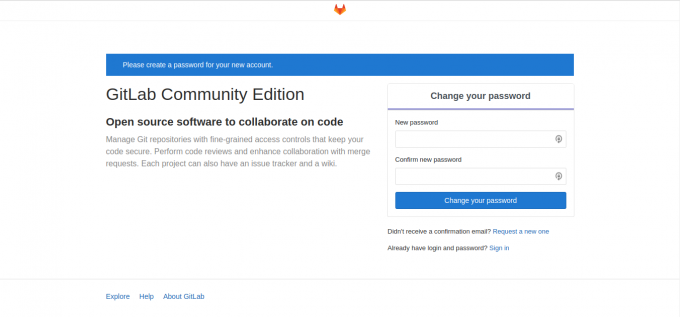
使用浏览器访问服务器IP地址即可进入GitLab的web服务,GitLab的默认用户名为root,首次访问会显示更改root密码的页面,密码自己设定即可:
GitLab的使用
-
关于GitLab的常用命令,可以参考GitLab基本操作这篇文章;
-
在企业使用中,我们访问GitLab服务可能是需要通过域名或者反向代理内网的GitLab服务来实现的,而GitLab的自带的nginx配置文件,在
/var/opt/gitlab/nginx/conf目录下:[root@vm1 ~]# ls /var/opt/gitlab/nginx/conf/ gitlab-http.conf nginx.conf nginx-status.conf- 其中nginx.conf是nginx主配置文件,gitlab-http.conf是GitLab的web服务配置文件。
-
我们可以编辑gitlab-http.conf文件来为其配置域名和端口;
-
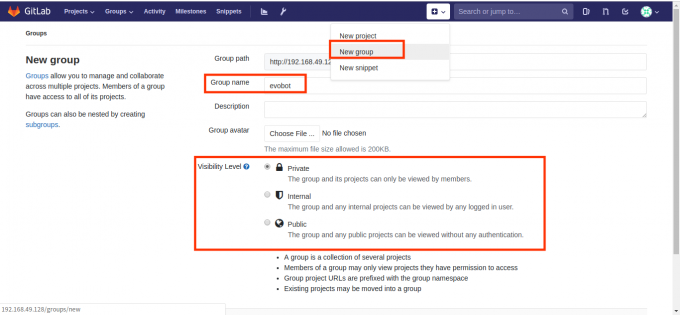
访问GitLab的web服务,首先可以创建一个新的用户组:
- 这里可以设置组名、描述、以及组的级别,级别分别是私有、内部、公开三种。
-
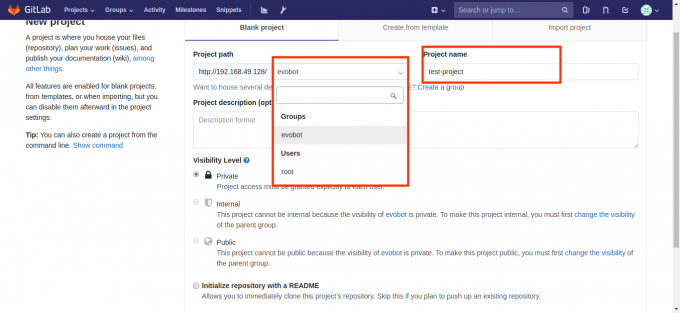
然后我们可以创建新的项目:
- 在创建项目页面,可以为项目分配用户组,项目名,基本与Github类似。
- 另外我们也需要在自己账号中添加公钥进去,才能对仓库进行推送。
-
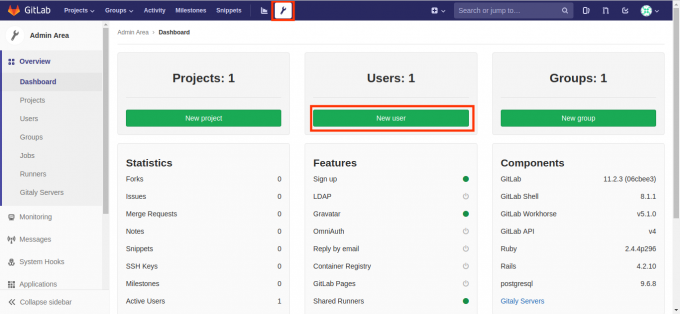
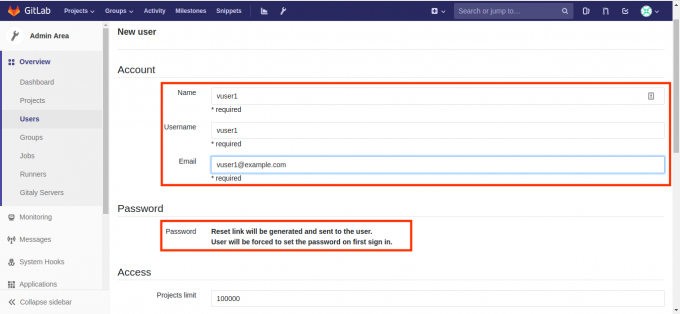
在GitLab中创建用户,如下图所示,点击导航中的扳手按钮:
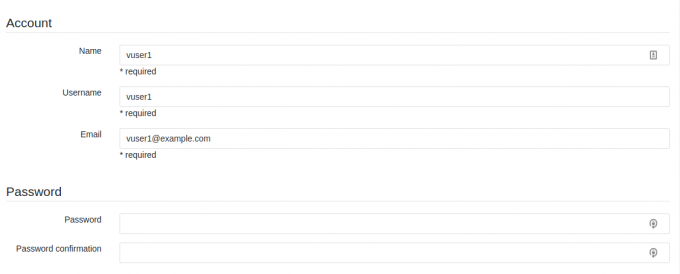
- 在用户密码这里,新用户GitLab是通过发送邮件让用户设置密码的,但我们并未设置邮件系统,所以可以在创建完用户后,点击用户的Edit按钮为其设置密码。
-
新用户在首次登录时,GitLab也会让用户更改密码,并且新用户也可以创建自己的项目和用户组。
GitLab备份恢复
-
GitLab自带的有备份工具,备份时,使用
gitlab-rake gitlab:backup:create命令,GitLab可以不停服备份:[root@vm1 ~]# gitlab-rake gitlab:backup:create Dumping database ... Dumping PostgreSQL database gitlabhq_production ... [DONE] done Dumping repositories ... * evobot/test-project ... [SKIPPED] [SKIPPED] Wiki done Dumping uploads ... done Dumping builds ... done Dumping artifacts ... done Dumping pages ... done Dumping lfs objects ... done Dumping container registry images ... [DISABLED] Creating backup archive: 1536767092_2018_09_12_11.2.3_gitlab_backup.tar ... done # 备份文件的文件名 Uploading backup archive to remote storage ... skipped Deleting tmp directories ... done done done done done done done done Deleting old backups ... skipping- 在备份的输出信息中,会显示备份文件的文件名。
-
备份文件会存放在
/var/opt/gitlab/backups/目录下:[root@vm1 ~]# ls /var/opt/gitlab/backups/ 1536767092_2018_09_12_11.2.3_gitlab_backup.tar- GitLab的备份文件名是由时间戳、日期、版本号组成的,在恢复时,必须恢复到与备份文件同版本的GitLab中。
-
恢复备份,首先要先停止
unicorn(ruby的web server)和sidekiq(基于ruby的消息队列)服务,使用gitlab-ctl stop unicorn、gitlab-ctl stop sidekiq命令停止这两个服务,目的是暂停GitLab的数据变更; -
然后使用
gitlab-rake gitlab:backup:restore BACKUP=[backup-filename],这里只需要备份文件的文件名至gitlab前的名字:[root@vm1 ~]# ls /var/opt/gitlab/backups/ 1536767092_2018_09_12_11.2.3_gitlab_backup.tar [root@vm1 ~]# gitlab-rake gitlab:backup:restore BACKUP=1536767092_2018_09_12_11.2.3 -
最后再使用
gitlab-ctl start重启服务即可。

