本文主要介绍如何限制指定目录不解析php文件、以及如何限制user_agent,并且介绍了php相关的配置。
访问控制
禁止php解析
-
站点中可能会有上传的功能,如图片上传,如果不加以限制,那么可能被上传php文件,导致能够被解析,被上传恶意文件引起安全风险;
-
针对上面的问题,可以限制上传目录的php解析权限,让这些目录无法解析php文件,同时也可以对上传的php文件进行控制,deny上传php格式的文件,返回403错误,配置虚拟主机配置文件如下:
<VirtualHost *:80> DocumentRoot "/data/wwwroot/xtears.cn" ServerName xtears.cn ServerAlias www.abc.com www.123.com <Directory /data/wwwroot/xtears.cn/upload> php_admin_flag engine off <FilesMatch (.*)\.php(.*)> Order allow,deny Deny from all </FilesMatch> </Directory> ErrorLog "logs/xtears.cn-error_log" CustomLog "|/usr/local/apache2.4/bin/rotatelogs -l logs/xtears.cn-access_%Y%m%d.log 86400" common </VirtualHost> -
这里主要的核心配置为
php_admin_flag engine off,至于FilesMatch项的配置也可以不配置,但是不配置的情况下,上传的php能够查看其源代码。 -
更新配置文件后,网站根目录中创建upload目录,并放入一个php文件,使用curl访问查看配置生效情况:
$ curl -x118.24.153.130:80 xtears.cn/upload/upload.php -I
HTTP/1.1 403 Forbidden
Date: Fri, 01 Jun 2018 16:23:27 GMT
Server: Apache/2.4.33 (Unix) PHP/5.6.32
Content-Type: text/html; charset=iso-8859-1
//去掉FilesMatch配置 $ curl -x118.24.153.130:80 xtears.cn/upload/upload.php <?php echo "12312" ?>- 可以看到直接输出了php文件的源代码,文件并没有被解析,如果在浏览器中访问,则会下载php文件,同样不会被解析。
限制user_agent
-
user_agent可以理解为浏览器标识,有时候网站可能会受到CC攻击,即利用大量肉鸡同时对网站发起访问,从未导致网站瘫痪;
-
而限制user_agent解决这个问题,是因为大量的肉鸡访问,其user_agent都是一样的,并且在短时间内同时有大量的访问,对于这种情况,就需要限制user_agent,减轻服务器压力,对其返回403请求;
-
虚拟主机配置如下:
<VirtualHost *:80> DocumentRoot "/data/wwwroot/xtears.cn" ServerName xtears.cn ServerAlias www.abc.com www.123.com <IfModule mod_rewrite.c> RewriteEngine on RewriteCond %{HTTP_USER_AGENT} .*curl.* [NC,OR] RewriteCond %{HTTP_USER_AGENT} .*baidu.com.* [NC] RewriteRule .* - [F] </IfModule> ErrorLog "logs/xtears.cn-error_log" CustomLog "|/usr/local/apache2.4/bin/rotatelogs -l logs/xtears.cn-access_%Y%m%d.log 86400" common </VirtualHost> -
上面的配置中使用了rewrite模块,定义了条件
%{HTTP_USER_AGENT},匹配curl和baidu.com的user_agent,NC表示忽略大小写,OR表示两个条件的关系为或关系,如果没有OR,则表示条件与,RewriteRule中的[F]则表示forbidden; -
更新配置文件后,使用
curl的-A选项指定user_agent:$ curl -x118.24.153.130:80 xtears.cn/admin.php -I HTTP/1.1 403 Forbidden Date: Fri, 01 Jun 2018 17:01:20 GMT Server: Apache/2.4.33 (Unix) PHP/5.6.32 Content-Type: text/html; charset=iso-8859-1 //匹配到user_agent为curl,返回403状态码。 $ curl -A "EVOBOT.CN" -x118.24.153.130:80 xtears.cn/admin.php -I HTTP/1.1 200 OK Date: Fri, 01 Jun 2018 17:03:56 GMT Server: Apache/2.4.33 (Unix) PHP/5.6.32 X-Powered-By: PHP/5.6.32 Content-Type: text/html; charset=UTF-8 //使用-A指定其他的user_agent,则能正常访问 -
查看日志如下:
118.113.205.248 - - [02/Jun/2018:01:13:10 +0800] "HEAD http://xtears.cn/admin.php HTTP/1.1" 403 - "-" "curl/7.47.0"
118.113.205.248 - - [02/Jun/2018:01:13:12 +0800] "HEAD http://xtears.cn/admin.php HTTP/1.1" 403 - "-" "curl/7.47.0"

122.228.199.114 - - [02/Jun/2018:01:14:29 +0800] "HEAD http://xtears.cn/admin.php HTTP/1.1" 200 - "-" "EVOBOT.CN"
222.186.129.155 - - [02/Jun/2018:01:14:29 +0800] "HEAD http://xtears.cn/admin.php HTTP/1.1" 200 - "-" "EVOBOT.CN"
PHP相关配置
php配置文件
-
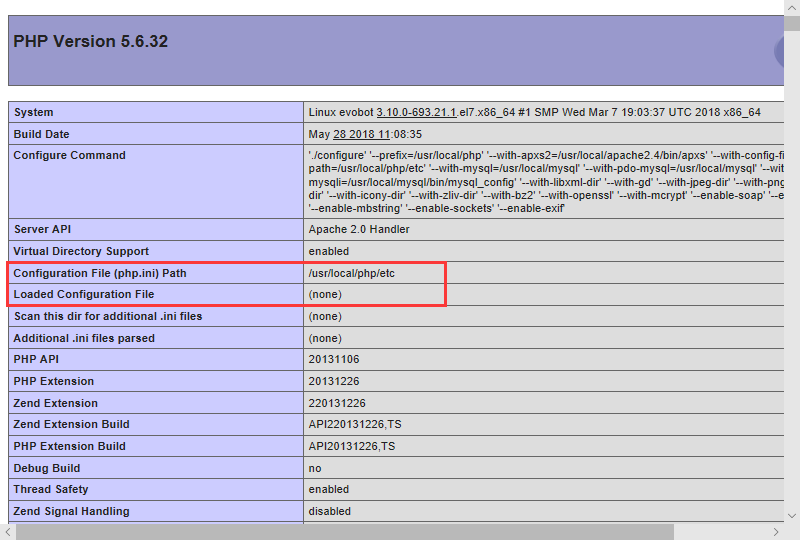
查看PHP配置文件位置:
/usr/local/php/bin/php -i | grep -i "loaded configuration file"- 由于这种方式查看的配置文件与网站所使用的并不一定是同一个php配置文件,所以一般使用访问phpinfo()的页面来查看php配置文件所在;

-
这里看到配置文件路径,但并未加载配置文件,从php源码包内复制配置文件到查看到的配置文件目录下:
# cp /usr/local/src/php-5.6.32/php.ini-development /usr/local/php/etc/php.ini -
重新更新apache配置后,刷新phpinfo页面即可看到加载的配置文件;
php.ini配置
禁用函数
-
常配置的是关闭函数
disable_functions,以下为可以禁止的较危险的函数:eval, assert, popen, passthru, escapeshellarg, escapeshellcmd, passthru, exec, system, chroot, scandir, chgrp, chown,shell_exec, proc_get_status, ini_alter, ini_restore, dl, pfsockopen, openlog, svslog, readlink, symlink, leak, popepassthru, stream_socket_server, popen, proc_open, proc_close, phpinfo -
这里将phpinfo函数也禁用,防止泄露服务器相关信息,在
php.ini中将上面的函数写到disable_functions后面:disable_functions = eval, assert, popen, passthru, escapeshellarg, escapeshellcmd, passthru, exec, system, chroot, scandir, chgrp, chown,shell_exec, proc_get_status, ini_alter, ini_restore, dl, pfsockopen, openlog, svslog, readlink, symlink, leak, popepassthru, stream_socket_server, popen, proc_open, proc_close, phpinfo -
禁用之后,访问到含有被禁用函数的页面时,会显示错误信息,如:
Warning: phpinfo() has been disabled for security reasons in /data/wwwroot/xtears.cn/index.php on line 2
时区设置
-
在php.ini中将
date.timezone定义为相应位置,可以为Asia/Shanghai或Asia/Chongqing:[Date] ; Defines the default timezone used by the date functions ; http://php.net/date.timezone date.timezone = Asia/Shanghai
错误信息及日志
-
在上面禁用函数配置中,当访问到有被禁用的函数页面中,会将错误信息打印在浏览器中,这样也是不安全的,在php.ini中将错误信息关闭:
display_errors = Off -
关闭了错误信息后,再次访问被禁用函数的页面,会显示空白,这样又不利于我们定位问题,所以同时还需要打开错误日志:
log_errors = On -
打开错误日志开关后,定义错误日志路径
error_log:; Log errors to specified file. PHP's default behavior is to leave this value ; empty. ; http://php.net/error-log ; Example: error_log = /tmp/php_errors.log # 取消注释,定义日志路径 ; Log errors to syslog (Event Log on Windows). ;error_log = syslog -
接着定义日志级别
error_reporting:; Common Values: ; E_ALL (Show all errors, warnings and notices including coding standards.) ; E_ALL & ~E_NOTICE (Show all errors, except for notices) ; E_ALL & ~E_NOTICE & ~E_STRICT (Show all errors, except for notices and coding standards warnings.) ; E_COMPILE_ERROR|E_RECOVERABLE_ERROR|E_ERROR|E_CORE_ERROR (Show only errors) ; Default Value: E_ALL & ~E_NOTICE & ~E_STRICT & ~E_DEPRECATED ; Development Value: E_ALL ; Production Value: E_ALL & ~E_DEPRECATED & ~E_STRICT ; http://php.net/error-reporting error_reporting = E_ALL # 默认为E_ALL一般生产环境使用
E_ALL & ~E_NOTICE日志级别,排除NOTICE日志,记录所有错误。E_ALL则记录所有日志。 -
重新加载配置文件后,查看
/tmp下是否生成日志:[root@evobot ~]# ls -l /tmp/php_errors.log -rw-r--r-- 1 daemon daemon 1035936 6月 2 17:02 /tmp/php_errors.log这个php日志的属主和属组都是httpd的启动用户。
目录隔离
-
为了防止一个网站被攻击后影响其他网站,所以需要对站点配置
open_basedir,让网站被攻击后只能限定在站点内,不能到其他目录去; -
打开php.ini配置文件,配置
open_basedir如下:open_basedir = /data/wwwroot/xtears.cn:/tmp -
经过上面的配置,那么用户访问就只能在xtears.cn目录内和/tmp目录内,/tmp是apache默认临时文件目录,如果不加的话会导致上传文件等发生错误。如果将目录改成其他错误路径,则会报500状态码:
[root@evobot ~]# curl -A 'EVOBOT' -x118.24.153.130:80 xtears.cn/index.php -I HTTP/1.0 500 Internal Server Error Date: Sat, 02 Jun 2018 09:21:10 GMT Server: Apache/2.4.33 (Unix) PHP/5.6.32 X-Powered-By: PHP/5.6.32 Connection: close Content-Type: text/html; charset=UTF-8 -
在php.ini做目录隔离只能对一个站点有效,如果有多个站点,那么会导致别的站点也无法正常访问,所以应该在Apache的虚拟主机配置文件中定义basedir,在虚拟主机中增加
php_admin_value配置:<VirtualHost *:80> DocumentRoot "/data/wwwroot/xtears.cn" ServerName xtears.cn ServerAlias www.abc.com www.123.com php_admin_value open_basedir "/data/wwwroot/xtears.cn:/tmp/" <IfModule mod_rewrite.c> RewriteEngine on RewriteCond %{HTTP_USER_AGENT} .*curl.* [NC,OR] RewriteCond %{HTTP_USER_AGENT} .*baidu.com.* [NC] RewriteRule .* - [F] </IfModule> ErrorLog "logs/xtears.cn-error_log" CustomLog "|/usr/local/apache2.4/bin/rotatelogs -l logs/xtears.cn-access_%Y%m%d.log 86400" combined </VirtualHost> -
上面的
php_admin_value open_basedir配置就只对当前的虚拟主机生效,php_admin_value不仅可以定义open_basedir针对其他的如错误日志等等也可以进行配置;
Apache压缩功能
-
由于服务器带宽资源非常昂贵,所以能够对html、css、js等静态元素进行压缩,能够节约大量资源,apache的压缩功能需要模块
deflate支持,使用apachectl -l查看是否有mod_deflate:# /usr/local/apache2.4/bin/apachectl -l | grep deflate # ls /usr/local/apache2.4/modules/ | grep deflate mod_deflate.so如果上面的命令都没找到模块的话,则表示apache不支持压缩,需要重新编译或以扩展形式安装,重新编译需要使用选项
--enable-deflate=shared -
找到了deflate模块,则在httpd.conf中增加或打开
LoadModule deflate_module modules/mod_deflate.so注释; -
然后继续增加如下配置:
<IfModule deflate_module>
DeflateCompressionLevel 5
AddOutputFilterByType DEFLATE text/html text/plain text/xml
AddOutputFilter DEFLATE js css
</IfModule>
其中DeflateCompressionLevel指压缩等级,从1-9,9为最高等级。
Apache自定义header
-
自定义header需要模块
headers_module,使用/usr/local/apache2.4/bin/apachectl -M | grep header查看是否加载了模块; -
然后在
httpd.conf中打开模块注释,并添加一下内容:<IfModule headers_module> RequestHeader unset Proxy early Header add MyHeader "xtears header" </IfModule> -
使用curl查看header是否生效:
$ curl -A 'evobot' -x118.24.153.130:80 xtears.cn -I
HTTP/1.1 200 OK
Date: Sat, 02 Jun 2018 10:11:47 GMT
Server: Apache/2.4.33 (Unix) PHP/5.6.32
X-Powered-By: PHP/5.6.32
MyHeader: xtears header
Content-Type: text/html; charset=UTF-8
Apache的keepalive
-
在APACHE的httpd.conf中,KeepAlive是指保持连接活跃,类似于Mysql的永久连接。如果将KeepAlive设置为On,那么来自同一客户端的请求就不需要再一次连接,避免每次请求都要新建一个连接而加重服务器的负担。
-
KeepAlive的连接活跃时间是受KeepAliveTimeOut限制的。如果第二次请求和第一次请求之间超过KeepAliveTimeOut的时间的话,第一次连接就会中断,再新建第二个连接。所以一般情况下,图片较多的网站应该把KeepAlive设为On。
-
如果KeepAliveTimeOut设置的时间过短,例如设置为1秒,那么APACHE就会频繁的建立新连接,当然会耗费不少的资源;反之,如果KeepAliveTimeOut设置的时间过长,例如设置为300秒,那么APACHE中会有很多无用的连接会占用服务器的资源,
-
所以,到底要把KeepAliveTimeOut设置为多少,要看网站的流量、服务器的配置而定。其实,这和MySql的机制有点相似,KeepAlive相当于mysql_connect或mysql_pconnect,KeepAliveTimeOut相当于wait_timeout。
-
httpd.conf中,增加配置如下:
KeepAlive On
KeepAliveTimeOut 3
