MongoDB安装及用户管理
- MongoDB介绍
- MongoDB安装
- 连接MongoDB
- MongoDB用户管理
MongoDB介绍
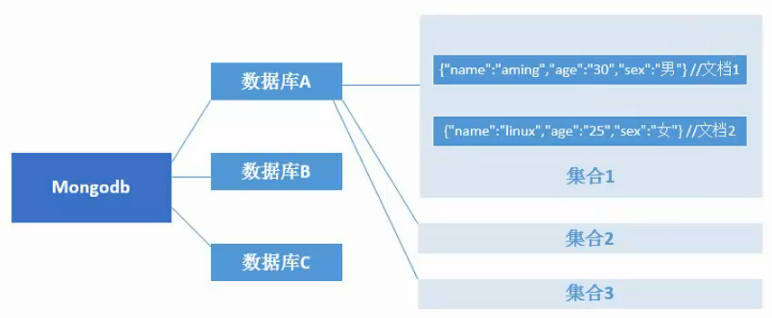
- MongoDB是文档型数据库,其基于分布式,属于NoSQL的一种,在NoSQL中是最像关系型数据库的;
- MongoDB将数据存储为一个文档,数据结构由键值对组成,MongoDB文档类似于JSON对象,字段值可以包含其他文档、数组及文档数组;
- 由于MongoDB基于分布式,所以很容易扩展;
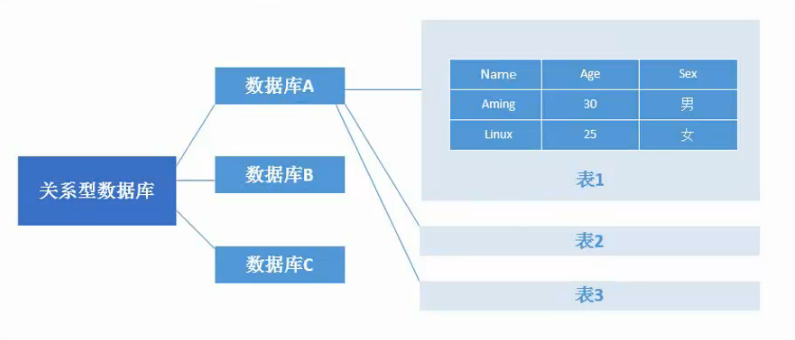
- MongoDB和关系型数据库的对比如下表:
| SQL术语/概念 | MongoDB术语/概念 | 解释/说明 |
|---|---|---|
| database | database | 数据库 |
| table | collection | 数据库表/集合 |
| row | document | 数据记录行/文档 |
| column | field | 数据字段/域 |
| index | index | 索引 |
| table joins | 表连接,MongoDB不支持 | |
| primary key | primary key | 主键,MongoDB自动将_id字段设置为主键 |
- MongoDB数据结构与关系型数据库对比:
安装MongoDB
-
MongoDB官方提供了软件仓库,可以访问官方安装文档查看最新的安装方法,这里安装的是MongoDB3.4版本;
-
创建**/etc/yum.repos.d/MongoDB-org-3.4.repo**文件,写入以下内容:
[MongoDB-org-3.4] name=MongoDB 3.4 Repository baseurl=https://repo.MongoDB.org/yum/redhat/$releasever/MongoDB-org/3.4/x86_64/ gpgcheck=0 enabled=1 -
然后使用
yum list |grep MongoDB查看是否有MongoDB的软件包; -
最后使用
yum install MongoDB-org安装MongoDB。
连接MongoDB
-
MongoDB的配置文件是
/etc/mongod.conf,其中systemLog配置项定义了日志文件所在位置;storage配置项的dbPath定义了数据库文件存储位置,类似于MySQL的dbdir,processManagement配置项的pidFilePath定义了pid文件所在位置;net配置项定义了端口和绑定的ip,其中绑定的ip可以配置多个,使用逗号分隔多个ip。 -
启动MongoDB,使用命令
systemctl start mongod,默认MongoDB监听27017端口:$ systemctl start mongod $ netstat -tlnp|grep mongod tcp 0 0 127.0.0.1:27017 0.0.0.0:* LISTEN 45903/mongod -
连接MongoDB,进入命令行,直接执行
mongo命令- 如果修改了MongoDB的监听端口和绑定的ip,则连接MongoDB需要使用
mongo --port [port] --host [ip] - 如果设置了MongoDB登陆密码,则需要使用
mongo -u[username] -p[passwd] --authenticationDatabase [db],其中--authenticationDatabase [db]指定被加密的数据库名。
- 如果修改了MongoDB的监听端口和绑定的ip,则连接MongoDB需要使用
MongoDB用户管理
用户管理
-
创建用户:
- 在MongoDB命令行中,执行
usr admin切换到admin库; - 执行以下命令创建用户:
db.createUser({user:"admin",customData:{description:"superuser"},pwd:"adminpass",roles:[{role:"root",db:"admin"}]})- 其中
user字段是指定新建的用户;,``customData是为用户添加描述信息,为可选参数;pwd指定用户的密码;roles为用户分配角色,其中role指定角色,db`指定所在数据库。
- 在MongoDB命令行中,执行
-
查看用户:
use admin,查看用户必须切换到admin库;db.system.users.find()查看所有用户:
> db.system.users.find() { "_id" : "admin.admin", "user" : "admin", "db" : "admin", "credentials" : {"SCRAM-SHA-1" : { "iterationCount" : 10000, "salt" : "kApN+wKv9ZS8mGO3RHKVWA==", "storedKey" : "J1waQisqBRTguyx3d4Gw4V9dy+c=", "serverKey" : "kntNqgUpOTnMw5OtFF1oJKSx4Fg=" } }, "customData" : { "description" : "superuser" }, "roles" : [ { "role" : "root", "db" : "admin" } ] }- 另外也可以使用
show users查看用户:
> show users { "_id" : "admin.admin", "user" : "admin", "db" : "admin", "customData" : { "description" : "superuser" }, "roles" : [ { "role" : "root", "db" : "admin" } ] } -
删除用户
db.dropUser('username')用来删除指定用户:
# 创建用户 > db.createUser({user:"evobot",pwd:"evobot",roles:[{role:"read",db:"testdb"}]}) Successfully added user: { "user" : "evobot", "roles" : [ { "role" : "read", "db" : "testdb" } ] } > show users { "_id" : "admin.admin", "user" : "admin", "db" : "admin", "customData" : { "description" : "superuser" }, "roles" : [ { "role" : "root", "db" : "admin" } ] } { "_id" : "admin.evobot", "user" : "evobot", "db" : "admin", "roles" : [ { "role" : "read", "db" : "testdb" } ] } # 删除用户 > db.dropUser('evobot') true > show users { "_id" : "admin.admin", "user" : "admin", "db" : "admin", "customData" : { "description" : "superuser" }, "roles" : [ { "role" : "root", "db" : "admin" } ] } -
新用户生效
- 想要让新创建的用户生效,要先编辑启动脚本,启动脚本为
/usr/lib/systemd/system/mongod.service,在脚本中的OPTIONS=后添加--auth:
Environment="OPTIONS=--auth -f /etc/mongod.conf"- 然后执行
systemctl daemon-reload重新加载服务,再执行systemctl restart mongod重启mongod服务:
$ systemctl daemon-reload $ systemctl restart mongod $ ps aux |grep mongod mongod 45988 20.0 16.0 971708 35876 ? Sl 22:58 0:01 /usr/bin/mongod --auth -f /etc/mongod.conf- 重新登陆MongoDB命令行,在不使用密码的情况下,登陆后使用admin数据库执行
show users会报错:
$ mongo MongoDB shell version v3.4.16 connecting to: MongoDB://127.0.0.1:27017 MongoDB server version: 3.4.16 > use admin switched to db admin > show users 2018-08-25T23:01:06.333+0800 E QUERY [thread1] Error: not authorized on admin to execute command { usersInfo: 1.0 } : _getErrorWithCode@src/mongo/shell/utils.js:25:13 DB.prototype.getUsers@src/mongo/shell/db.js:1539:1 shellHelper.show@src/mongo/shell/utils.js:771:9 shellHelper@src/mongo/shell/utils.js:678:15 @(shellhelp2):1:1- 重新使用用户名密码登陆:
$ mongo -u"admin" -p"adminpass" --authenticationDatabase "admin"
MongoDB shell version v3.4.16
connecting to: MongoDB://127.0.0.1:27017
MongoDB server version: 3.4.16
> use admin
switched to db admin
> show users
{
        "_id" : "admin.admin",
        "user" : "admin",
        "db" : "admin",
        "customData" : {
                "description" : "superuser"
        },
        "roles" : [
                {
                        "role" : "root",
                        "db" : "admin"
                }
        ]
}
MongoDB中,用户名密码是针对数据库进行认证的,所以在登陆时,必须指定正确的数据库。
- 想要让新创建的用户生效,要先编辑启动脚本,启动脚本为
-
多个库用户认证
- 创建新用户,并指定多个用户角色和对多个db授权:
> use db1
switched to db db1

> db.createUser({user:"test1",pwd:"123456",roles:[{role:"readWrite",db:"db1"},{role:"read",db:"db2"}]})
Successfully added user: {
        "user" : "test1",
        "roles" : [
                {
                        "role" : "readWrite",
                        "db" : "db1"
                },
                {
                        "role" : "read",
                        "db" : "db2"
                }
        ]
}
上面的命令指定了test1用户对db1可读写,对db2只读,另外mongdb中,直接使用
use [dbname]即可进入数据库,如果数据库不存在,则会自动创建。- 在MongoDB中,在哪个库创建了用户,就需要在哪个库验证身份,即用户信息是跟随数据库的,例如上面的test1用户虽然对db2有读取权限,但也必须在db1库上进行身份验证,查看用户也需要在创建用户的库上:
> use db2 switched to db db2 > show users > use db1 switched to db db1 > show users { "_id" : "db1.test1", "user" : "test1", "db" : "db1", "roles" : [ { "role" : "readWrite", "db" : "db1" }, { "role" : "read", "db" : "db2" } ] }- 在命令行中也可以进行用户认证,使用命令
db.auth('username','passwd'):
> use db1
switched to db db1
> db.auth('test1','123456')
1
用户角色
- Read:允许用户读取指定数据库;
- readWrite:允许用户读写指定数据库;
- dbAdmin:允许用户在执行数据库中执行管理函数,如索引创建、删除、查看统计或访问system.profile;
- userAdmin:允许用户向system.users集合写入,可以在指定数据库里创建、删除和管理用户;
- clusterAdmin:只在admin数据库中可用,赋予用户所有分片和复制集相关函数的管理权限;
- readAnyDatabase:只在admin数据库中可用,赋予用户所偶数据库的读权限;
- readWriteAnyDatabase:只在admin数据库中可用,赋予用户所有数据库的读写权限;
- userAdminAnyDatabase:只在admin数据库中可用,赋予用户所有数据库的userAdmin权限;
- dbAdminAnyDatabase:只在admin数据库中可用,赋予用户所有数据库的dbAdmin权限;
- root:只在admin数据库中可用,超级账号,超级权限。