本文继续介绍Apache的配置,主要为如何配置用户认证,如何配置域名跳转以及了解Apache的访问日志结构。
Apache用户认证
虚拟主机用户认证
-
用户认证就是打开站点时提示输入用户名和密码,与一般登陆不同,用户认证不会显示任何网页内容,而是直接提示输入用户名和密码。
-
配置用户认证,需要配置虚拟主机配置文件
conf/extra/httpd-vhosts.conf,将需要增加用户认证的虚拟主机配置中ServerAlias下增加以下配置:<Directory /data/wwwroot/xtears.com> AllowOverride AuthConfig AuthName "123.com user auth" AuthType Basic AuthUserFile /data/.htpasswd require valid-user </Directory>- AllowOverride AuthConfig表示打开用户认证开关;
- AuthName是定义用户认证的提示信息;
- AuthType Basic则是定义认证类型为
Basic,一般只需要使用Basic即可; - AuthUserFile则是定义认证的用户名密码文件路径;
- require valid-user是指定需要认证的用户为全部可用用户,即密码文件中定义的用户。
-
生成用户名密码文件,使用apache自带命令
htpasswd,选项-c为创建,-m为使用md5加密,然后指定密码文件所在位置,最后加上需要创建的用户名,具体使用方法如下:[root@evobot apache2.4]# /usr/local/apache2.4/bin/htpasswd -c -m /data/.htpasswd evobot New password: Re-type new password: Adding password for user evobot -
生成的
.htpasswd文件内容如下:[root@evobot apache2.4]# cat /data/.htpasswd evobot:$apr1$Yjt7h7hR$QgRFpki/qY1.avjRe4ahY/ -
配置完成后使用
apachectl -t检查配置文件正确性,apachectl graceful更新配置:[root@evobot apache2.4]# /usr/local/apache2.4/bin/apachectl -t Syntax OK [root@evobot apache2.4]# /usr/local/apache2.4/bin/apachectl graceful -
在另一台机器上访问,提示401错误,为认证:
$ curl -x118.24.153.130:80 xtears.com -I HTTP/1.1 401 Unauthorized Date: Tue, 29 May 2018 16:21:06 GMT Server: Apache/2.4.33 (Unix) PHP/5.6.32 WWW-Authenticate: Basic realm="123.com user auth" Content-Type: text/html; charset=iso-8859-1 -
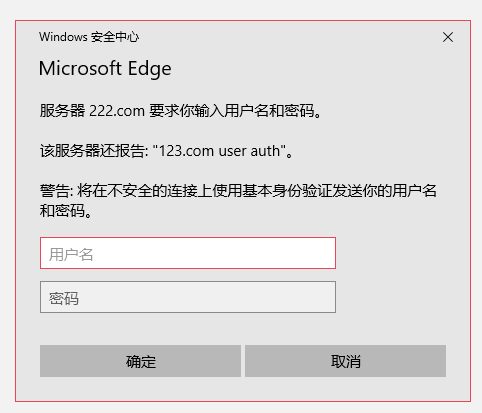
使用浏览器访问,提示输入用户名密码:

- 输入用户名密码后才可以看到网页内容,或者使用curl访问并且提供用户名密码:
curl -x118.24.153.130:80 -uevobot:clikks xtears.com
xtears.com%
单个文件认证
-
一个站点有时候可能只有后台页面需要进行二次认证,比如admin页面,所以apache也可以配置针对单个文件的用户认证;
-
配置文件认证,在虚拟主机配置的ServerAlias配置下方,增加以下配置,如针对123.php进行认证:
<FilesMatch 123.php> AllowOverride AuthConfig AuthName "123.com user auth" AuthType Basic AuthUserFile /data/.htpasswd require valid-user </FilesMatch> -
然后检查配置文件正确性,并且在站点跟目录下创建
123.php文件,并更新配置文件:<?php echo "auth success!"; ?> -
不使用用户名密码访问站点,已经不再提示认证和401:
$ curl -x118.24.153.130:80 xtears.com xtears.com% -
访问123.php,提示401未认证:
$ curl -x118.24.153.130:80 xtears.com/123.php -I HTTP/1.1 401 Unauthorized Date: Tue, 29 May 2018 16:39:12 GMT Server: Apache/2.4.33 (Unix) PHP/5.6.32 WWW-Authenticate: Basic realm="123.com user auth" Content-Type: text/html; charset=iso-8859-1 -
加上用户名密码访问:
$ curl -x118.24.153.130:80 -uevobot:clikks xtears.com/123.php
auth success!%
域名跳转
-
实际使用中,有时需要将一个域名跳转到另一个域名上,使两个域名能够访问同一个站点,而跳转是为了让被跳转的域名在搜索引擎中的权重提升,这里的跳转使用的http状态码为301永久重定向。
-
域名跳转到配置仍然在虚拟主机内进行配置,并且依赖于
mod_rewrite模块,配置如下:<VirtualHost *:80> DocumentRoot "/data/wwwroot/xtears.com" ServerName xtears.com ServerAlias 222.com 333.com <IfModule mod_rewrite.c> RewriteEngine on RewriteCond %{HTTP_HOST} !^xtears.com$ RewriteRule ^/(.*)$ http://xtears.com/$1 [R=301,L] </IfModule> ErrorLog "logs/xtears.com-error_log" CustomLog "logs/xtears.com-access_log" common </VirtualHost><IfModule mod_rewrite.c>表示需要mod_rewrite模块支持;RewriteEngine on表示打开rewrite功能;RewriteCond定义rewrite的条件,当域名不是xtears.com时满足条件;RewriteRule定义跳转规则,^/表示访问的域名,(.*)则表示域名后面访问的资源,这部分需要继续传递给被跳转的域名后面去,所以使用$1表示匹配到的第一部分,如果有多个小括号进行匹配,则第二部分为$2,依此类推,然后[R=301,L]中R=301表示跳转的状态码,L表示跳转一次结束(last)。
-
保存配置,检查正确性并更新配置之后,需要确认apache是否加载了rewrite模块:
/usr/local/apache2.4/bin/apachectl -M | grep rewrite- 如果没有加载,需要在httpd.conf中打开模块配置:
LoadModule rewrite_module modules/mod_rewrite.so- 完成后再重新加载配置查看模块是否加载:
[root@evobot apache2.4]# /usr/local/apache2.4/bin/apachectl -M | grep rewrite rewrite_module (shared) -
尝试访问站点:
$ curl -x118.24.153.130:80 -uevobot:clikks 222.com/ -I HTTP/1.1 301 Moved Permanently Date: Tue, 29 May 2018 17:11:00 GMT Server: Apache/2.4.33 (Unix) PHP/5.6.32 Location: http://xtears.com/ Content-Type: text/html; charset=iso-8859-1 $ curl -x118.24.153.130:80 -uevobot:clikks 222.com/ <!DOCTYPE HTML PUBLIC "-//IETF//DTD HTML 2.0//EN"> <html><head> <title>301 Moved Permanently</title> </head><body> <h1>Moved Permanently</h1> <p>The document has moved <a href="http://xtears.com/">here</a>.</p> </body></html> $ curl -x118.24.153.130:80 -uevobot:clikks 222.com/123.php -I HTTP/1.1 301 Moved Permanently Date: Tue, 29 May 2018 17:13:14 GMT Server: Apache/2.4.33 (Unix) PHP/5.6.32 Location: http://xtears.com/123.php Content-Type: text/html; charset=iso-8859-1- 可以看到访问的状态码为301,跳转到了xtears.com,并且访问的资源地址也被传递给了被跳转的域名。
Apache访问日志
日志格式
-
apache的访问日志记录了用户的每一个请求:
[root@evobot apache2.4]# tail -n 10 /usr/local/apache2.4/logs/xtears.com-access_log 118.113.205.231 - - [30/May/2018:01:15:00 +0800] "GET / HTTP/1.1" 301 226 118.113.205.231 - - [30/May/2018:01:15:00 +0800] "GET / HTTP/1.1" 200 10 118.113.205.231 - - [30/May/2018:01:15:10 +0800] "GET / HTTP/1.1" 200 10 118.113.205.231 - - [30/May/2018:01:15:14 +0800] "GET / HTTP/1.1" 200 10 118.113.205.231 - - [30/May/2018:01:15:14 +0800] "GET /123.php HTTP/1.1" 301 233 118.113.205.231 - - [30/May/2018:01:15:14 +0800] "GET / HTTP/1.1" 301 226 118.113.205.231 - - [30/May/2018:01:15:14 +0800] "GET / HTTP/1.1" 200 10 118.113.205.231 - - [30/May/2018:01:15:14 +0800] "GET /123.php HTTP/1.1" 200 13 118.113.205.231 - - [30/May/2018:01:15:14 +0800] "GET / HTTP/1.1" 301 226 118.113.205.231 - - [30/May/2018:01:15:14 +0800] "GET / HTTP/1.1" 200 10 -
而日志的格式,则是在httpd.conf中的
LogFormat配置项定义的:<IfModule log_config_module> # # The following directives define some format nicknames for use with # a CustomLog directive (see below). # LogFormat "%h %l %u %t \"%r\" %>s %b \"%{Referer}i\" \"%{User-Agent}i\"" combined LogFormat "%h %l %u %t \"%r\" %>s %b" common <IfModule logio_module> # You need to enable mod_logio.c to use %I and %O LogFormat "%h %l %u %t \"%r\" %>s %b \"%{Referer}i\" \"%{User-Agent}i\" %I %O" combinedio </IfModule> -
apache提供了两种日志格式,默认使用的是common项的格式,其中%h表示来源ip,%l、%u表示用户名密码,%t表示时间,%r表示请求方法和网址,%s则为状态码,%b表示大小;
-
combined则提供了更为详细的日志内容,如User-Agent,Referer上一次访问的地址。
修改虚拟主机日志格式
-
修改虚拟主机的日志格式,如将common改为combined,则在虚拟主机的日志配置将common改为combined:
<VirtualHost *:80> DocumentRoot "/data/wwwroot/xtears.com" ServerName xtears.com ServerAlias 222.com 333.com <IfModule mod_rewrite.c> RewriteEngine on RewriteCond %{HTTP_HOST} !^xtears.com$ RewriteRule ^/(.*)$ http://xtears.com/$1 [R=301,L] </IfModule> ErrorLog "logs/xtears.com-error_log" CustomLog "logs/xtears.com-access_log" combined </VirtualHost> -
然后更新配置后访问主机再查看日志如下:
[root@evobot apache2.4]# !tail tail -n 5 /usr/local/apache2.4/logs/xtears.com-access_log 118.113.205.231 - - [30/May/2018:01:15:14 +0800] "GET /123.php HTTP/1.1" 200 13 118.113.205.231 - - [30/May/2018:01:15:14 +0800] "GET / HTTP/1.1" 301 226 118.113.205.231 - - [30/May/2018:01:15:14 +0800] "GET / HTTP/1.1" 200 10 118.113.205.231 - - [30/May/2018:01:31:23 +0800] "GET /123.php HTTP/1.1" 200 13 "-" "Mozilla/5.0 (Windows NT 10.0; Win64; x64) AppleWebKit/537.36 (KHTML, like Gecko) Chrome/64.0.3282.140 Safari/537.36 Edge/17.17672" 118.113.205.231 - - [30/May/2018:01:31:23 +0800] "GET /123.php HTTP/1.1" 200 13 "-" "Mozilla/5.0 (Windows NT 10.0; Win64; x64) AppleWebKit/537.36 (KHTML, like Gecko) Chrome/64.0.3282.140 Safari/537.36 Edge/17.17672"- 可以看到最后两条日志记录了更加详细的信息。
